The Reports tab
The AwesomeAds Reports tab provides a full reporting suite that enables you to track all metrics from the ads running on your platform. The reporting tool is a great way to see a snapshot of your performance. You can create both ad hoc reports and scheduled reports that are automatically sent to you via email. You can also export the data to manipulate it further in Excel.
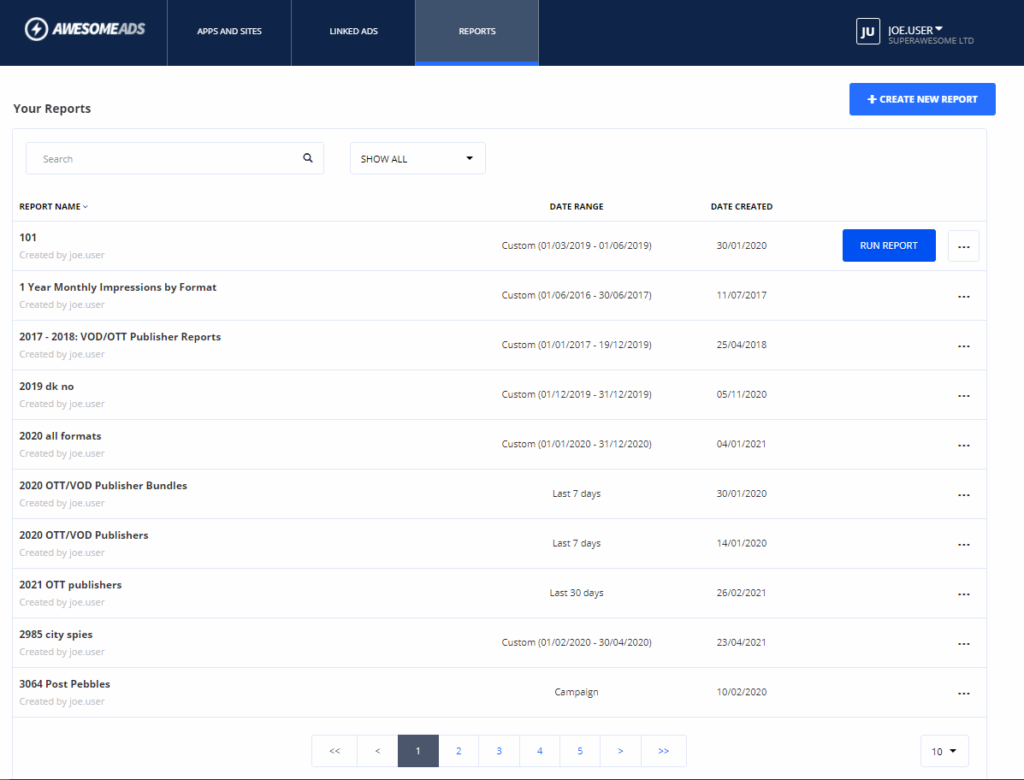
To get started, click on the Reports tab in the main menu. The Your Reports view displays a list of all saved reports:

In this view, you can:
- Create a new report.
- Search for a report by report name.
- Display all reports or only those created by you.
- Sort the list of reports by clicking on a column heading.
- Hover over a report to access the Run report button.
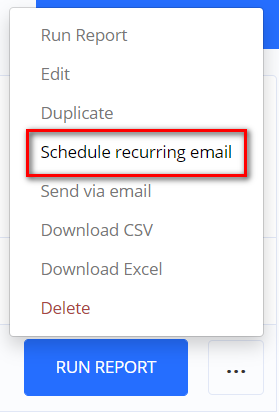
- Click the ‘…’ icon to display a menu of the actions you can perform on a report:
 The available actions are:
Create a new report
Select Reports from the main menu, and then click Create new report:

The Create New Report view is displayed:

Using the dropdown menus, select your report criteria:
| Menu | Description |
|---|---|
| Select dates | Select the date range to report on. You can either: – Select a preset date option. For example, Today, Last Month, Year to Date. – Specify a date range by selecting Custom Dates from the dropdown menu. A calendar is displayed, enabling you to select a start and end date. |
| Select keys | Select the key(s) to report on. A key is the metric you want to report the KPIs on. NOTE: You can select as many keys as you like. However, your report may be difficult to read if there are many keys. In this case, you may wish to export the data to Excel to format it as required. The most commonly used keys are: – Timeframe keys such as Hour, Day, Month, Quarter, Year – Placement tag or ID – Format – Country – Campaign – Operating system |
| Select metrics | Choose the metrics you want for the selected key(s). NOTE: AwesomeAds does not include any metrics that require a persistent identifier. However, you can track performance and reach metrics. Examples of the most relevant metrics are: – Requests – Ads attempted – Impressions – Revenue – Fill rate – VCR/CTR (depending on the format) |
| Timezone | Select the timezone to report on. The default time zone is UTC. |
| Select filters | You can apply filters to your selected key(s) to narrow your report results. For example, if you choose ‘Country’ as a key, you can then apply a filter to limit the report to the United States only. Filters allow granular reporting without overloading the report or having to export to another editor such as Excel. To apply a filter: 1. First select the key. 2. Then add the filter and choose to Include or Exclude the data that matches that filter. |
Re-order the report columns
While creating or editing a report, you can re-order the report columns by dragging them:

Run a report
After setting up your new report in the Create New Report view, you need to run the report to check the output prior to saving it. You can also run a saved report from the Your Reports view.
Click Run Report. The Result view displays the report data. You can:
- Click a column heading to sort the data by that column.
- Use the buttons at the top right of the report to download, edit, and save the report:
 The Edit button takes you back to the report editor where you can adjust the report criteria.
Save a report
- The first time you save a report, you are prompted to give the report a name. Use a descriptive name that enables you to search easily for the report later.
- After editing a previously saved report, you can:
- click Save to save the report with the same name.
- click Save As to save the changed report with a new name, leaving the original report unchanged. Alternatively you can duplicate the report.
Duplicate a report
You can duplicate a report, which means you save the report with a new name, leaving the original report unchanged. This is useful if you wish to apply a new date range or add another key or metric without having to create a new report from scratch.
To duplicate a report:
- Click the Reports tab in the main menu, and search for the required report.
- Click the ‘…’ icon, and then click Duplicate:

- Enter a name for the duplicate report and click Save.
Schedule a report to be emailed
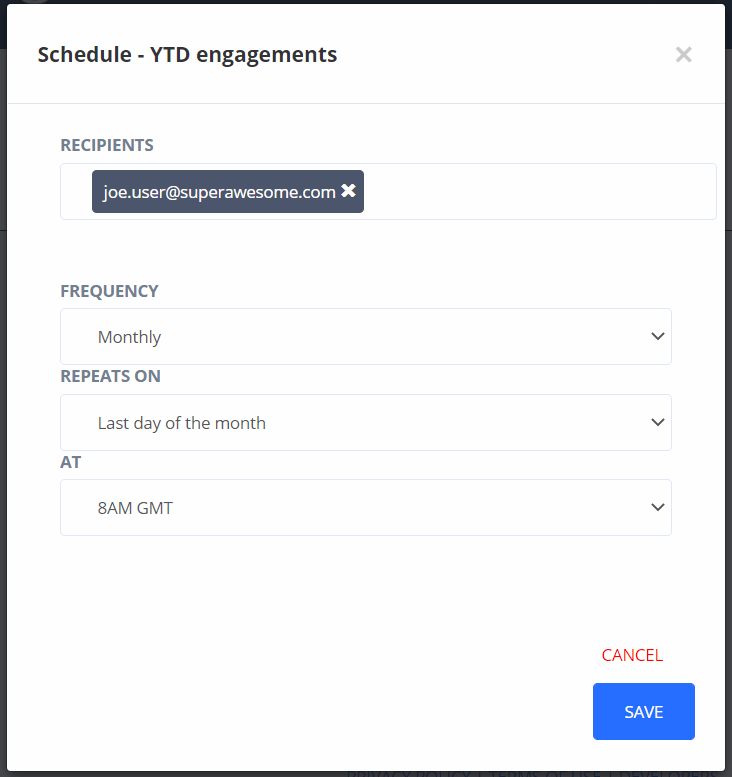
You can schedule a report to be sent regularly to one or more email addresses. The report is sent as a .CSV attachment to the email.
To schedule a recurring emailed report:
- Click the Reports tab in the main menu, and search for the required report.
- Click the ‘…’ icon, and then click Schedule recurring email:

- In the Schedule pop-up, enter the scheduled report details and click Save:

Download a report as CSV or Excel
To download a report:
- Click on the Reports tab in the main menu.
- In the Your Reports view, locate the required report.
- Click the ‘…’ icon and then select either Download CSV or Download Excel, as required. The report is downloaded to your Downloads folder.
Alternatively, you can download a report from the Result view when you run a report using the Download button in the top right corner.
Send a report via email
To send a report once as a .CSV attachment to one or more specified email addresses:
- Click on the Reports tab in the main menu.
- In the Your Reports view, locate the required report.
- Click the ‘…’ icon and then select Send via email.
- In the pop-up, enter the email address(es) to which you wish to send the report, and then click Send.
Share the URL for a report
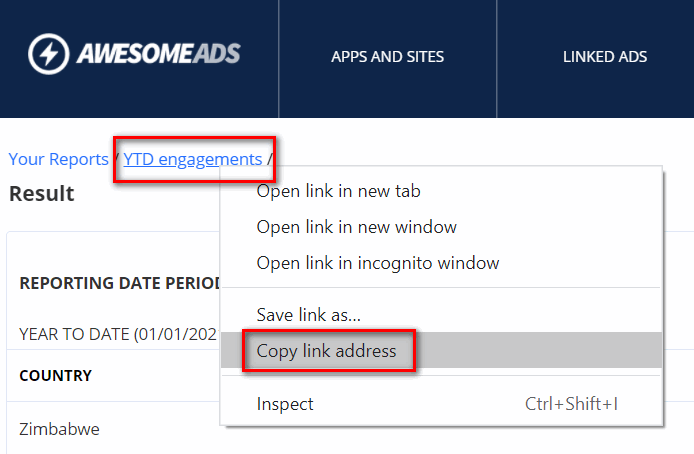
You can copy the URL of any report. This is useful if you wish to share the report with other users (for example, your SuperAwesome account manager) or manipulate a report while keeping the original data set available.
To copy the URL:
- Run the report.
- In the Result view, right-click the report name hyperlink, and then select Copy link address:

The recipient of the URL can only access the report if they are logged into their AwesomeAds account. The URL opens the report in the Your reports editor view. From here, the recipient can run the report, or amend the report criteria and then run it.
API reporting
API reporting is available on request. Please contact your account manager if you require this capability.
